This thing is my pride and joy as of the moment. I'm completely in love, and am ready to tell the world!
I have been working on this bad boy for longer than I should have, but now that it is finished, I am so stoked!
This is where it started...
 I started off with a granny mandala pattern from Crochet With RaymondI made two different ones, with different colors (except for the white)
.

 I had some extra memory foam lying around, and have been cutting it up for random projects. I used some for a pillow, and then used some for this cushion. I wanted it to be pretty thick, cause I know my butt will fall asleep if its too thin. I decided that three layers high was enough for my desired effect.

Once I had the top and bottom done, and had my base measured and cut out, I was able to eyeball the size I needed for the side. I just measured the height, and made a long strip going around.
 Then I attached that long strip to both sides using a single crochet.

 AND....TA DA!!!!!!!
Isn't she amazing?!?!?!?
 I love how both sides are a different color scheme!
 This cushion is a great size, and is really comfortable to sit on! I love how it looks with my cool pillows in the background too!
 Come on- You know your in love too...
Hey all! Did you miss me?
Life got to be really crazy for me, and blogging just seemed the last thing on Earth I wanted to take the time to do. Oh well!
During my blogging vacation I didn't do a whole lot of crafting or crochet. I wasn't very creative... But since I have been back on the wagon, I have a couple pretty cool projects I was able to finish up, as well as begin.
 Hopefully it won't be that long before you hear from me again!ps- Those were flowers I did for another project, and loved the pic I took in the backyard on this super spiffy bench. Enjoy!
The thought and motivation behind this little craft was nothing other than pure boredom. I wasn't working, and needed something to keep my hands and mind busy for a little while. I found some needle-nose pliers and wire cutters, and got to work making a ring.
This is where it started... 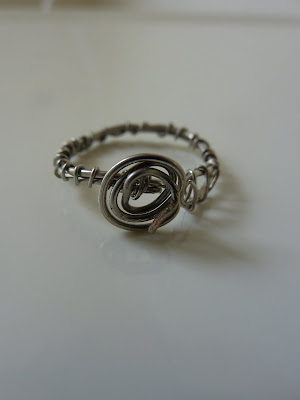 I actually used a kitchen (turkey) baster as a template, and wrapped the wire around in a spiral, then around the baster, and back again. It wasn't as sturdy as I wanted, so I found some thinner wire laying around and wrapped it up to make it more strong.
 I was originally going to keep it as just the wire cause I really liked it, but then I needed more time to kill, so I came up with the idea to make a fabric flower, and slap it on there. I simply used a strip of fabric I had laying around, and twisted it and spiraled it, until I had a size I liked. I then added a cute little pearl in the center.
 A little wire + a little fabric + boredom = a super cute ring!
 So, once that one was done, I got another wild hair up my butt and decided to turn a charm I had into a ring as well.
 This charm was once my sisters (who has since died) and I have always wanted to do something with it but never knew what. I couldn't put it on a necklace cause the holes were too small, so the wire was a nice match.
 Its the perfect size! The band (wire) is just the right gauge and it really makes the charm stand out well. This is a ring that I love so much, I have been wearing almost every day.
 This was a super easy project to do and I can't wait to go to the bead store (mental note for tomorrow!) and
 get
some super cute beads to make more rings out of.
I just recently picked up some sheets of shrink plastic (AKA Shrinky Dinks) and am totally in love! This stuff has put a new spin on my creativity, and caused me to think in new ways. I have been ferociously scribbling down ideas and designs, and find myself even thinking of things I can make just before I fall asleep. It might be on the verge of weird and obsessive, but I am having fun so, Oh well!

I recently made this fun necklace charm out of shrink plastic. It was super easy- simply draw on the plastic, cut it out, and stick it in the oven.
 Though I would love to take credit for making the necklace too, it came from my sister. I simply attached a jump ring to the charm, and stuck it on the necklace I already had.
 This was my first experience with this material, and since then I have really experimented and tweaked a lot. So, the next time I show you something with shrink plastic, it will look better than this!
Hey there! Wow, sorry its been so long since I posted! You know how life is sometimes though- so busy you just can't keep track of what comes next. I have been through a whirlwind of changes in the past couple months, and am just now settling down again.
But never fear, cause I have been super duper crafty and creative in that time, and I have a lot to catch you all up on and a lot to share with you.
So without further ado, here is something that was simple, fun, and colorful for my bedroom!
 Not sure what would be an appropriate name for this, but its just layered felt circles attached to ribbon.
 I recently found a ton of felt in my studio, and decided to keep my mind and hands busy with this quick project. It was fun picking out all the color combos!
 Once I had all the colors cut out and shaped up, I got to work with my trusty friend- The hot glue gun! I dabbed glue on all the layers, then attached the last layer to the ribbon, and TA DA!!!
 Its not much, but it does make me happy to look at when my bedroom door is closed
 I started off with a granny mandala pattern from Crochet With Raymond

 Then I attached that long strip to both sides using a single crochet.
 AND....TA DA!!!!!!!
 I love how both sides are a different color scheme!
 This cushion is a great size, and is really comfortable to sit on! I love how it looks with my cool pillows in the background too!
 Come on- You know your in love too...


